
If you’ve ever worked with GPUs, you know how crucial it is to understand how they manage workloads. Today, we’re diving into Intel’s approach to kernel scheduling, particularly when using SYCL and PyTorch for matrix operations. We’ll look at how concepts like workgroups, work-items, and SIMD32 come into play as we add two matrices of size (256x256).
Let’s break this down into simpler terms and get into the nitty-gritty!
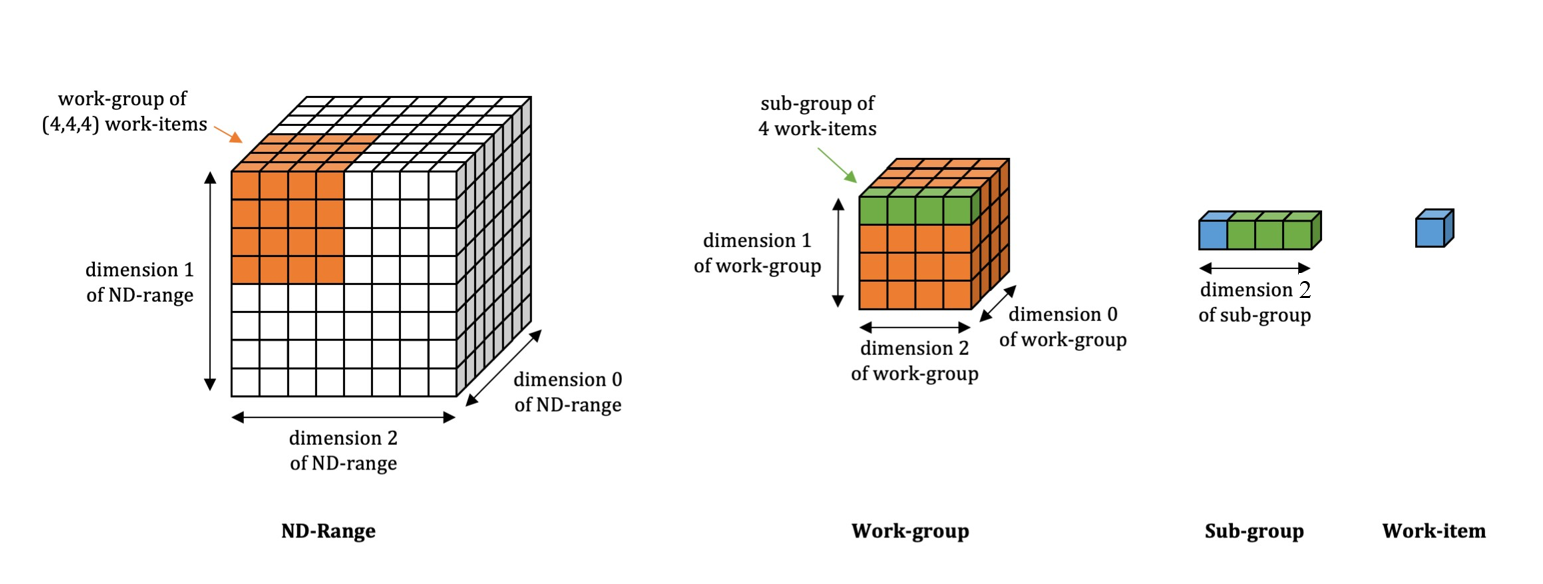
1. Kernel Scheduling Basics: Workgroups, Work-items, and Threads
Before we jump into code, let’s clarify some key terms related to how GPUs organize their tasks:
-
Work-item: This is the smallest unit of computation the GPU executes. Think of it as a worker that handles a single task. In our case, each work-item is responsible for processing one element of the matrix.
-
Workgroup: A collection of work-items that are grouped together for execution. Workgroups enable the GPU to handle thousands of work-items in parallel, making computations much faster.
-
Threadgroup: On Intel GPUs, this is a collection of threads that can manage one or more work-items. They’re mapped to SIMD (Single Instruction, Multiple Data) units, which are designed for parallel execution.
-
SIMD32: This refers to the capability of processing 32 work-items simultaneously. Essentially, this means that in one execution cycle, you can run the same instruction across 32 different data points, significantly speeding up the computation.
Workgroup and Threadgroup Configuration
For our matrix of size 256x256, let’s break down the workload:
- Total Work-items: Since each element of the matrix requires a work-item, the total number of work-items is (256 X 256 = 65536).
- Workgroups: To handle these work-items efficiently, we divide them into 64 workgroups.
- Local Work-items per Workgroup: Each workgroup will contain 1024 local work-items, structured as (256 X 4).
Here’s how the dimensions and organization look:
- Local Items: (Lx, Ly, Lz) = (256, 4, 1)
- Workgroups: (Gx, Gy, Gz) = (1, 64, 1)
1
2
3
4
5
6
Workload Breakdown:
- Tensor Size: (256, 256)
- Total Work-items: 65536 (256 * 256)
- Workgroups: 64
- Local Work-items per Workgroup: 1024 (256 * 4)
- SIMD32: 32 work-items executed in parallel
2. SYCL Kernel Example: Adding Two Matrices
Now that we’ve got the basics down, let’s look at how to add two matrices using SYCL. Here’s a straightforward example:
1
2
3
4
5
6
7
8
9
10
11
12
13
14
15
16
17
18
19
20
21
22
23
24
25
26
27
28
29
30
31
32
33
34
35
36
37
38
39
40
#include <CL/sycl.hpp>
#include <iostream>

using namespace sycl;

int main() {
    constexpr size_t N = 256;  // Matrix dimensions
    constexpr size_t M = 256;

    // Create SYCL queue
    queue q;

    // Allocate memory for input matrices and result matrix
    float* matrix_a = malloc_shared<float>(N * M, q);
    float* matrix_b = malloc_shared<float>(N * M, q);
    float* result_matrix = malloc_shared<float>(N * M, q);

    // Initialize the matrices
    for (size_t i = 0; i < N * M; ++i) {
        matrix_a[i] = 1.0f;
        matrix_b[i] = 2.0f;
    }

    // Submit the kernel to add the matrices
    q.parallel_for(range<2>(N, M), [=](id<2> idx) {
        size_t i = idx[0] * M + idx[1];  // Flatten the 2D index
        result_matrix[i] = matrix_a[i] + matrix_b[i];
    }).wait();

    // Display the results
    std::cout << "Result matrix [0][0]: " << result_matrix[0] << std::endl;
    std::cout << "Result matrix [255][255]: " << result_matrix[255 * M + 255] << std::endl;

    // Free memory
    free(matrix_a, q);
    free(matrix_b, q);
    free(result_matrix, q);

    return 0;
}
In this SYCL code:
- We create a
parallel_forloop that triggers the kernel for a 2D range of (256 X 256) work-items. Each work-item adds a single element frommatrix_atomatrix_band stores it inresult_matrix. - With 64 workgroups, each consisting of 1024 local work-items, the workload is distributed effectively across the GPU.
3. Using PyTorch with Intel Extension (IPEX) for GPUs
Let’s switch gears and see how we can achieve the same matrix addition using PyTorch and Intel’s extension, IPEX.
1
2
3
4
5
6
7
8
9
10
11
12
13
14
15
16
17
import torch
import intel_extension_for_pytorch as ipex

assert torch.xpu.is_available(), "XPU is not available"

def add_matrices(a, b):
    return a + b

# Initialize matrices on XPU
mat_1 = torch.randn(256, 256, dtype=torch.bfloat16, device="xpu")
mat_2 = torch.randn(256, 256, dtype=torch.bfloat16, device="xpu")

# Compile the kernel with IPEX backend
compiled_add = torch.compile(add_matrices, backend="ipex")
out = compiled_add(mat_1, mat_2)

print(out)
Key Points in the PyTorch Example:
- We create matrices directly on the XPU (Intel GPU) device.
- By using torch.compile with the IPEX backend, the kernel is compiled and optimized specifically for Intel GPUs.
- The scheduling and execution of work-items happen similarly to the SYCL kernel, utilizing SIMD32 for efficient processing.
Conclusion
Intel GPUs have a sophisticated kernel scheduling system that efficiently allocates workloads across Execution Units (EUs) while leveraging SIMD32 for maximum throughput. By understanding how workgroups, work-items, and threadgroups interact with the SIMD architecture, you can fine-tune your GPU kernels for optimal performance.
So, whether you’re using SYCL or PyTorch, knowing how Intel’s architecture works can help you write better-performing code for matrix operations and beyond. Next time you’re working with GPUs, keep these concepts in mind, and you’ll be well on your way to harnessing the full power of Intel hardware!